The artwork gets all the attention, but the small metal part on the back of a campaign button decides almost everything practical about it: where a volunteer can wear it, whether it survives a day of door-knocking, and whether a donor will actually put it on a wool blazer. Most first-time buyers order the default pin and never think about it again. If you are placing a real campaign order, the backing is worth two minutes of thought, because it is usually free to change and it is nearly impossible to fix after the buttons are pressed.
The backing decides where the button can go
The standard fastener on a round campaign button is a safety-pin back: a spring pin that bends and locks under a prong on the button shell. It is the cheapest option, it is what people expect, and it works on almost any shirt, tote bag, or hat. The tradeoff is that it pierces fabric, which most cotton and canvas shrug off but which can leave a visible hole in a silk scarf or a fine-gauge sweater. For a rally crowd handing buttons to strangers, the pierce-anything pin is exactly right. For a black-tie fundraiser where guests are in tailored clothing, it can be the wrong first impression.
Two construction styles sit under that same pin. A fully metal shell with a pinned collet is the durable, weatherproof choice and the one most political shops press by default. A cardboard back with a stapled or glued safety pin costs less and can be fine for a single event, but it is the version that fails in a jacket pocket or a rain shower. When you are comparing two quotes that look far apart on price, the backing construction is often the hidden reason.
Non-piercing options: bulldog clips and magnets
When the wearer should not put a hole in their clothing, you have two good answers. A bulldog clip (sometimes called a pinch or swivel clip) attaches to a lapel, tie, shirt pocket, or badge lanyard by squeezing two wings and releasing. It swivels, so the button hangs straight, and it is the default for staff and press credentials at conventions. It costs more than a plain pin and it needs an edge to grip, so it will not clip onto the flat front of a t-shirt.
A magnet back uses a magnet on the button and a second magnet or steel keeper behind the fabric, holding the button with no pin at all. It is the premium, no-holes choice for donors, board members, and anyone in expensive clothing. The cautions are real and worth stating plainly: magnets hold poorly through thick coats or heavy knits, the loose keeper piece is easy to drop and lose, and you should keep magnetic buttons away from pacemakers and from anything with a magnetic stripe or a hard drive. For a targeted VIP giveaway, magnets feel considered. For ten thousand street buttons, they are an expensive answer to a problem you do not have.
Specialty backs for ribbons, keys, and awards
Beyond the three everyday choices, a handful of specialty fasteners solve narrow problems. Two-prong and bridal-hook backs are made to sit on top of an award rosette or to thread a ribbon, which is how you get the delegate ribbons and volunteer-of-the-year badges you see at state conventions. A keychain back turns the same printed shell into a takeaway that lives on a set of keys long after the yard signs come down, which stretches your branding past election day. There are even bottle-opener backs for the after-party. None of these are campaign staples, but if your order includes a VIP tier or a thank-you gift, mixing in a small run of a specialty back is a cheap way to make part of the order feel distinct.
Size still sets the tone, from 1 inch to 3 inch
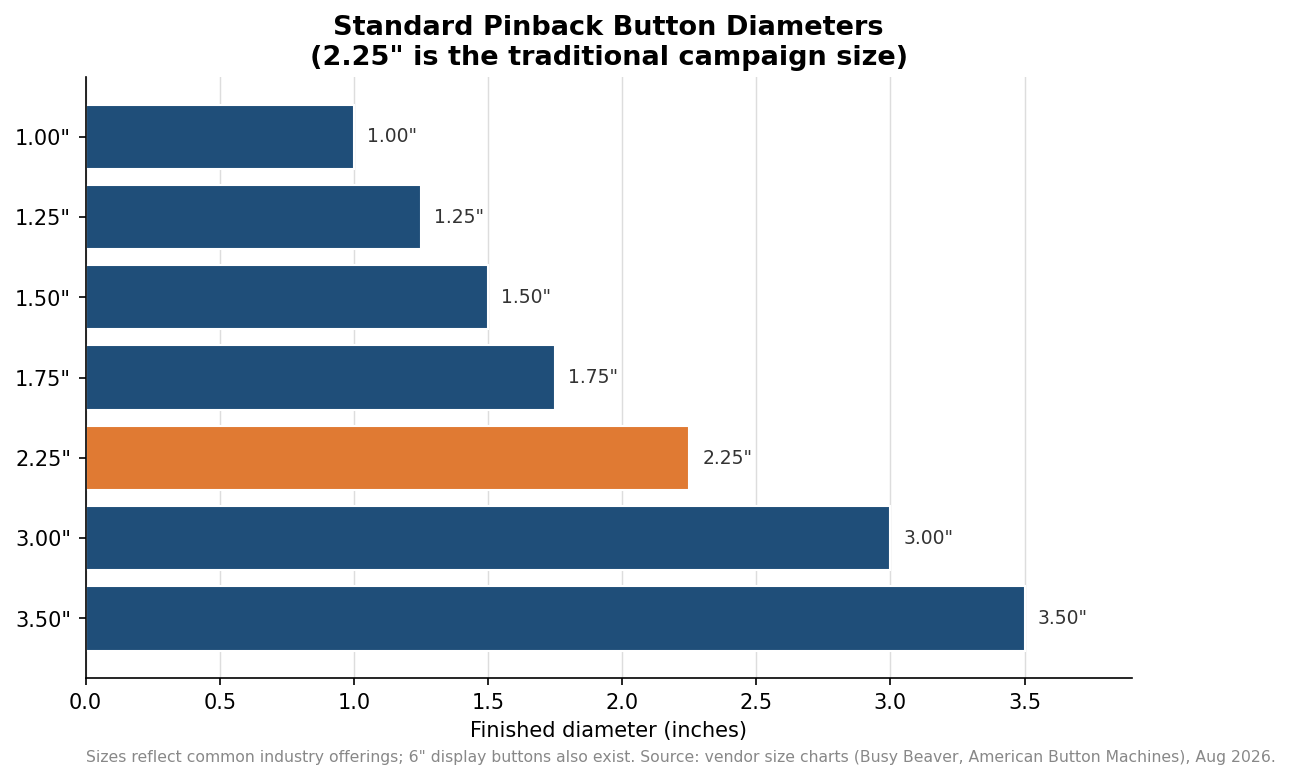
Backing answers where; size answers how loud. The 2.25-inch round is the traditional campaign size, roughly the diameter of the top of a soda can, big enough to carry a name and a slogan and still pin cleanly to a shirt. It has been the political default for decades for a reason. The 1-inch and 1.25-inch buttons read as modern and understated and have become popular for merch tables and low-key supporter pins, but at that size you can realistically fit a logo or a short name, not a full ticket and tagline. Step up to 3-inch for a booth centerpiece or a photo button, and to 6-inch only for a display stand rather than something anyone wears. As a rule, pick the size for the smallest thing that must be legible at arm’s length, then confirm your art still breathes inside the safe area once the wrap and bleed are accounted for.
What a backing choice does to your budget
Two forces move the per-button price: the backing you choose and the quantity you order. Upgrading from a plain safety pin to a bulldog clip or a magnet adds cost to every unit, and on a large run that surcharge is the difference between one backing for the whole order and a split order. Quantity moves the number far more dramatically. Custom buttons follow a steep bulk curve: the jump from a couple dozen to a few hundred can cut the unit price to a fraction of the small-run rate, after which the curve flattens and each additional thousand saves only pennies. The indicative figures below come from one US vendor’s public price sheet for a plain-back 2.25-inch button; treat the shape of the curve as the lesson, not the exact cents, because setup, artwork, backing upgrades, and shipping all sit on top and every shop prices them differently.
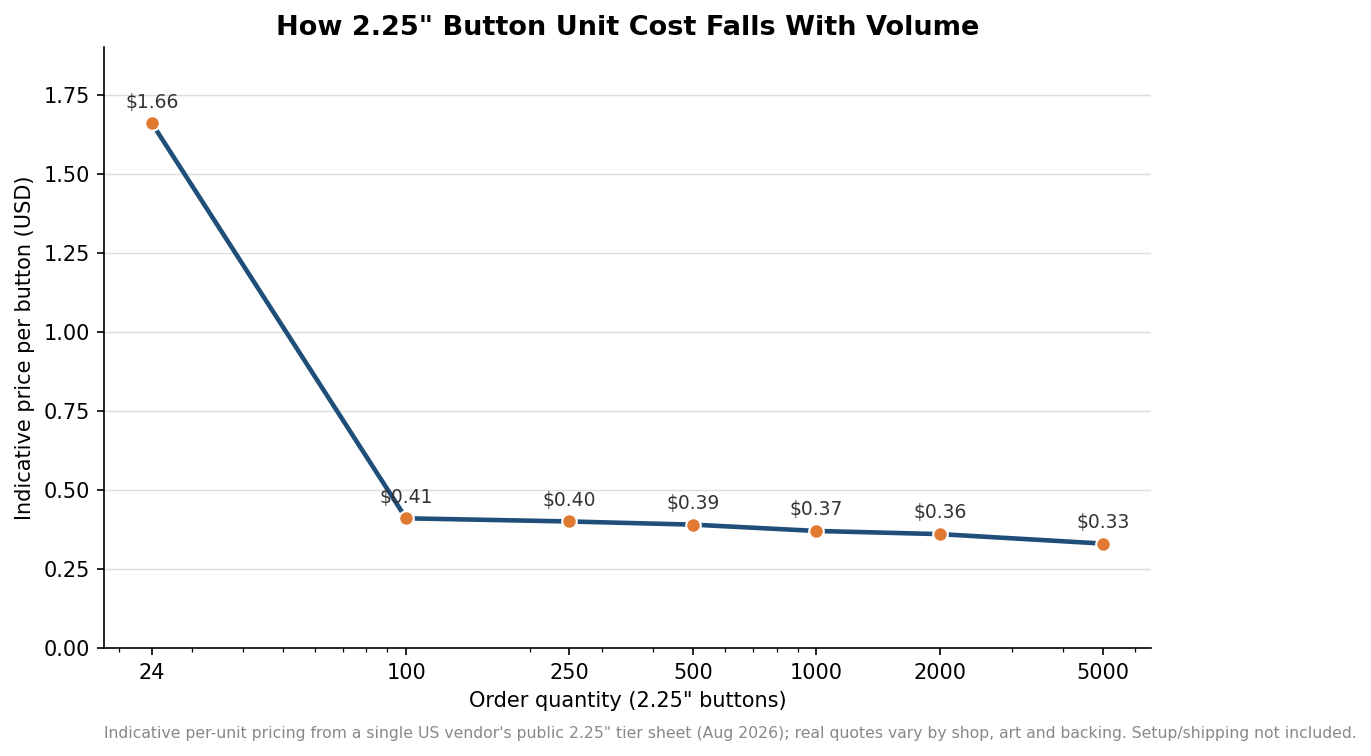
The practical takeaway for a campaign order is to decide the backing before you decide the quantity, because the two interact. If most of your buttons are street giveaways, order the bulk of the run on plain safety pins where the volume discount is deepest, and carve out a small, separately specified batch of magnet or clip backs for donors and staff. That way you pay the premium only where it earns its keep, you hit the price break on the large plain-back run, and nobody at the fundraiser has to decide whether your button is worth a hole in their jacket.